Xamarin Android Setup
Send push notifications to your Xamarin.Android app with Pushy.
At any time, you may refer to our Xamarin.Android demo project for a working demo.
Create an App
Sign up for Pushy Trial to get started, or log in to your existing account
Note: No credit card needed. Upgrade to the Pro plan when you're ready by visiting the Billing page.
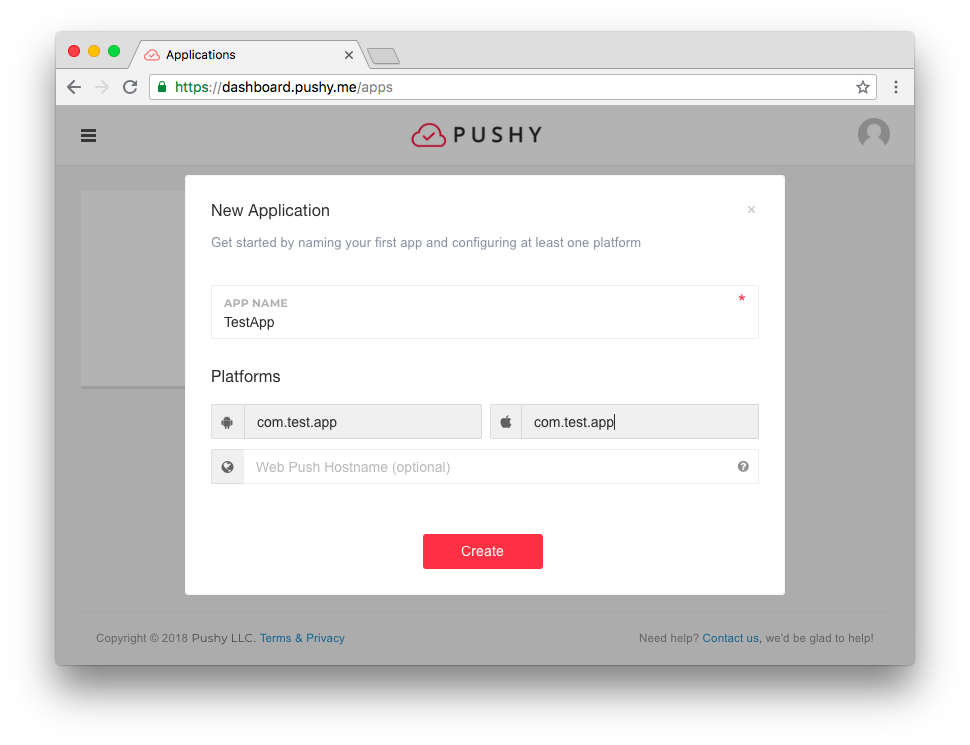
Create an app and fill in the Android Package Name & iOS Bundle ID:
Please ensure the Android Package Name & iOS Bundle ID you enter precisely match the ones configured in your project files, as they are used to automatically link your client apps with the Pushy Dashboard app having the same Android Package Name & iOS Bundle ID.
Note: If you have already created an app in the Pushy Dashboard for another platform, simply configure your existing dashboard app with your Android Package Name & iOS Bundle ID in the App Settings tab and proceed to the next step.
Click Create and proceed to the next step.
Get the SDK
Install the SDK by searching for Pushy within your project's NuGet package manager:
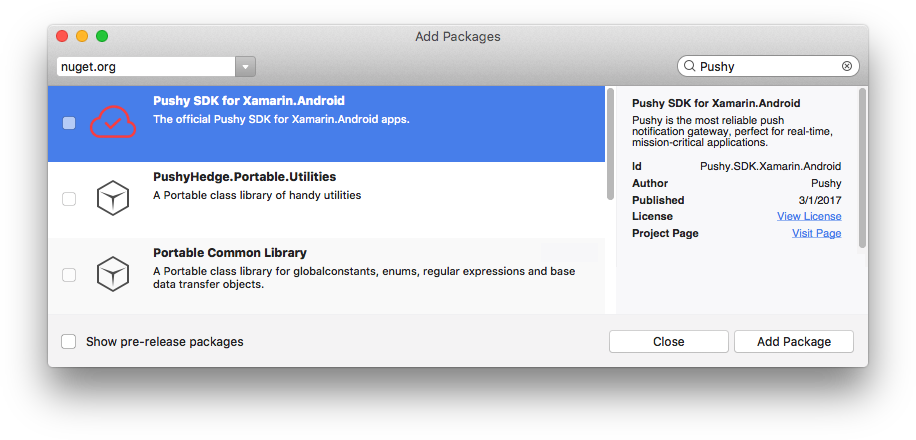
Note: Make sure the Id of the package you are installing is Pushy.SDK.Xamarin.Android.
Modify AndroidManifest
Add the following lines to your AndroidManifest.xml, inside the <manifest> tag:
<!-- Pushy Permissions -->

<uses-permission android:name="android.permission.INTERNET" />
<uses-permission android:name="android.permission.WAKE_LOCK" />
<uses-permission android:name="android.permission.POST_NOTIFICATIONS" />
<uses-permission android:name="android.permission.ACCESS_NETWORK_STATE" />
<uses-permission android:name="android.permission.RECEIVE_BOOT_COMPLETED" />
<uses-permission android:name="android.permission.SCHEDULE_EXACT_ALARM" />

<!-- End Pushy Permissions -->
You should manually omit any permission declarations that your app already asks for.
Add the following lines to your AndroidManifest.xml, inside the <application> tag:
<!-- Pushy Declarations -->

<!-- Pushy Update Receiver -->
<!-- Do not modify - internal BroadcastReceiver that restarts the listener service -->
<receiver android:name="me.pushy.sdk.receivers.PushyUpdateReceiver" android:exported="false">
    <intent-filter>
        <action android:name="android.intent.action.MY_PACKAGE_REPLACED" />
    </intent-filter>
</receiver>

<!-- Pushy Boot Receiver -->
<!-- Do not modify - internal BroadcastReceiver that restarts the listener service -->
<receiver android:name="me.pushy.sdk.receivers.PushyBootReceiver" android:exported="false">
    <intent-filter>
        <action android:name="android.intent.action.BOOT_COMPLETED"/>
    </intent-filter>
</receiver>

<!-- Pushy Socket Service -->
<!-- Do not modify - internal service -->
<service android:name="me.pushy.sdk.services.PushySocketService" android:stopWithTask="false" />

<!-- Pushy Job Service (added in Pushy SDK 1.0.35) -->
<!-- Do not modify - internal service -->
<service android:name="me.pushy.sdk.services.PushyJobService"
    android:permission="android.permission.BIND_JOB_SERVICE"
    android:stopWithTask="false" />

<!-- End Pushy Declarations -->
Register Devices
Users need to be uniquely identified to receive push notifications.
Every user is assigned a unique device token that you can use to push it at any given time. Once the user has been assigned a device token, it should be stored in your application's backend database.
Simply add the following blocking code to your application when you're ready to register the user for notifications:
var deviceToken = Pushy.Register(Application.Context);
Note: Pushy.Register(Context) is a synchronous, blocking call, so make sure to only execute it from within a background thread.
Asynchronous Implementation
Add the following code to your application when you're ready to register the user for notifications:
await RegisterForPushNotifications();
Copy the following RegisterForPushNotifications() method implementation and modify it accordingly to send device tokens to your backend server.
private async Task RegisterForPushNotifications()
{
    // Execute Pushy.Register() in a background thread
    await Task.Run(() =>
    {
        try
        {
            // Assign a unique token to this device
            string deviceToken = Pushy.Register(MainActivity.this);

            // Log it for debugging purposes
            Log.Debug("MyApp", "Pushy device token: " + deviceToken);

            // Send the token to your backend server via an HTTP GET request
            new URL("https://{YOUR_API_HOSTNAME}/register/device?token=" + deviceToken).OpenConnection();
        }
        catch (Exception exc)
        {
            // Log error to console
            Log.Error("MyApp", exc.Message, exc);
            return;
        }

        // Succeeded, optionally do something to alert the user
    });
}
Modify Launcher Activity
Invoke Pushy.Listen(this) in your launcher activity's OnCreate() method so that Pushy's internal notification listening service will restart itself, if necessary.
base.OnCreate(savedInstanceState);Pushy.Listen(this);Setup BroadcastReceiver
Declare a BroadcastReceiver that will receive your push notifications when they arrive. Your app can then execute any relevant action in response, such as displaying a notification, playing a sound, making a request, etc.
Create a PushReceiver.cs file within your app with the following sample code that displays a notification when a push is received:
using Android.App;
using Android.Content;
using Android.Graphics;
using Android.Media;
using ME.Pushy.Sdk;

namespace MyApp
{
	[BroadcastReceiver(Enabled = true, Exported = false)]
	[IntentFilter(new[] { "pushy.me" })]
	public class PushReceiver : BroadcastReceiver
	{
		public override void OnReceive(Context context, Intent intent)
		{
			string notificationTitle = "MyApp";
			string notificationText = "Test notification";

			// Attempt to extract the "message" property from the payload: {"message":"Hello World!"}
			if (intent.GetStringExtra("message") != null)
			{
				notificationText = intent.GetStringExtra("message");
			}

			// Prepare a notification with vibration, sound and lights
			var builder = new Notification.Builder(context)
				  .SetAutoCancel(true)
				  .SetSmallIcon(Android.Resource.Drawable.IcDialogInfo)
				  .SetContentTitle(notificationTitle)
				  .SetContentText(notificationText)
				  .SetLights(Color.Red, 1000, 1000)
				  .SetVibrate(new long[] { 0, 400, 250, 400 })
				  .SetSound(RingtoneManager.GetDefaultUri(RingtoneType.Notification))
				  .SetContentIntent(PendingIntent.GetActivity(context, 0, new Intent(context, typeof(MainActivity)), PendingIntentFlags.UpdateCurrent));

			// Automatically configure a Notification Channel for devices running Android O+
			Pushy.SetNotificationChannel(builder, context);

			// Get an instance of the NotificationManager service
			var notificationManager = (NotificationManager)context.GetSystemService(Context.NotificationService);

			// Build the notification and display it
            //
            // Use a random notification ID so multiple
            // notifications don't overwrite each other
            notificationManager.Notify((int)(Math.Random() * 100000), builder.Build());
        }
	}
}
Make sure to replace the MyApp namespace with your project namespace, and MainActivity with the name of your main activity.
Note: Please make sure to request the android.permission.VIBRATE permission within your AndroidManifest.xml if you'd like the notification to vibrate the device.
Feel free to modify this sample code to suit your own needs. In the next step, we'll take a look at how to parse the incoming payload data sent by your backend server.
Parse Notification Data
Any payload data that you send with your push notifications is made available to your app via the Intent extras of your PushReceiver class.
If you were to send a push notification with the following payload:
{"id": 1, "success": true, "message": "Hello World"}Then you'd be able to retrieve each value from within your PushReceiver.cs file like so:
int id = intent.GetIntExtra("id", 0);
string message = intent.GetStringExtra("message");
bool success = intent.GetBooleanExtra("success", false);
Note: Unlike GCM / FCM, we do not stringify your payload data, except if you supply JSON objects or arrays. This means that if you send {"id": 3}, you'd retrieve that value in the receiver using intent.GetIntExtra("id", 0).
Subscribe to Topics
Optionally subscribe the user to one or more topics to target multiple users with a shared interest when sending notifications.
Depending on your app's notification criteria, you may be able to leverage topics to simply the process of sending the same notification to multiple users. If your app only sends personalized notifications, skip this step and simply target individual users by their unique device tokens.
Simply add the following blocking code to subscribe the user to a topic:
Pushy.Subscribe("news", Application.Context);
Note: Make sure to execute this method from a background thread, similar to Pushy.Register(Context).
Also, replace news with your own case-sensitive topic name that matches the following regular expression: [a-zA-Z0-9-_.]{1,100}. You may also pass in a string[] array with multiple topics (limited to 100).
You can then notify multiple users subscribed to a certain topic by specifying the topic name (prefixed with /topics/) as the to parameter in the Send Notifications API.
Send Test Notification
Input your device token and select your app to send a test push notification:
Note: You can specify a topic instead of a device token (i.e. /topics/news). Also, if your app is not automatically detected, please manually copy the Secret API Key from the Dashboard and paste it into the form.
Did you receive the notification? If not, reach out, we'll be glad to help.
Congratulations on implementing Pushy in your Xamarin.Android app!
To start sending push notifications to your users, start persisting device tokens in your backend, and invoke the Send Notifications API when you want to send a notification. Follow our step-by-step guide: